COLOUR IMAGING WITH THE 1004x JG
IMAGING AND PROCESSING TECHNIQUE
This page was last updated 14th November2002
This is the procedure I am currently using to produce images with my 1004x JG camera. I am always learning so it will no doubt change with time. If you have any suggestions on how to improve my technique, preferably making it simpler and without spending money ;-) please do not hesitate to mail me at robin_astro@hotmail.com
NOTE! This is the way I do it. I take no responsibility for what you do. You alone are responsible for your own equipment and safety.
Set up
The set up I use for imaging is a Vixen VC200L 8inch Catadioptric telescope on a GPDX mount with Sky sensor 2000 PC computerised GOTO drive.
The normal focal length is 1800mm but this can be reduced to 1250mm with the Vixen focal length reducer or increased to 3600mm with a Barlow lens (I use a 35mm SLR 2x converter) depending on the size and brightness of the object.
I do not currently know a solution to image capturing from the 1004x at full resolution using a laptop (if you know how to do it please tell me!) so I currently work at the end of a 10m cable (video and parallel port lines) connected to the home desktop PC (a 200MHz Pentium running Windows 98SE and a Hauppauge WinTV capture card)
STOP PRESS! Steve Chambers has solved this problem It is now possible to use a USB video capture device with the 1004x-JG. I have built Jon Groves conversion module and USB version of his iCatch software which I use with a Hauppage USB live capture device and a 400MHz laptop. I am currently working on the best solution to allow both guiding and imaging without the desktop PC
I have made a hand controller, which connects, via a 10m cable to the SS2K computer guider socket. This allows me to centre the object in the frame on the PC monitor without having to keep trekking outside to the scope.
I also use a B+W TV as a monitor locally at the scope to aid focusing.
The scope, camera, cooler and TV monitor all run off 12V but at the moment I only have a small 7AH battery so I run the Peltier cooler and TV off a mains extension from the house (With earth leakage protection of course!)
Guiding System
For shots which need exposures longer than about 30 seconds I use a guiding system, a 60mm refractor piggybacked on the main scope with a Greyscale Quickcam and a laptop running guider.exe This sends guiding corrections to the Skysensor 2000 via a serial link
STOP PRESS: My prefered option is now to train the Periodic Error correction on the ss2k using the quickcam as an atouguider on the main OTA before each imaging run. I can then reliably get 2min exposures and even a useable number exposures up to 5 min unguided ie without the complication of the guidescope
Imaging
I try to set the scope up with good polar alignment. Although it is not critical for short exposures, and drift between frames can be compensated for in the processing stage, taking the four LRGB images can take over an hour in total and rotation of the field between the first and last images of a session, caused by poor polar alignment is much harder to remove.
Good polar alignment is critical when when automatically guiding using guide stars several degrees away from the imaged area. Poor alignment produces visible field rotation in long exposures.
I normally let the scope and camera etc cool for at least an hour before starting to take images. This gets rid of image distortion due to warm air currents and thermal contraction, which can cause focus to drift.
The most critical image is the Luminance or L. I aim to get the highest resolution, sharpest, deepest image I can as this contains all the detail in the final image. Once the target has been found in the flip mirror, I move the scope off to a nearby fairly faint star, flip the mirror to the camera and do fine focusing on the star image on the TV monitor. (Because the mirror is fixed on my scope, I do not have to worry about image or focus shift as I move the scope) I then return to the object and retreat indoors.
The shortest exposure which allows the object to be seen (eg 10sec) is selected in the iCatch software and final centering of the object is done with the guiding hand controller.
If auto-guiding is being used, the guidescope is aimed at a nearby bright star and centred using the eyepiece and flip mirror. The guide star is acquired on the guider CCD and the guiding program calibrated and set running. Guiding accuracy is normally +-1 pixel in any direction
The exposure is then increased to give the best image (A compromise between noise, star trails and avoiding saturation in bright areas of the target. So far I have left the capture software brightness/contrast settings at 128 each, there may be room for optimisation here also) Enough frames are then saved to allow at least 10 and preferably 20 or more good frames with no drift to be selected later. (The success rate depends on many factors including the condition of the mount, the scope balance, polar alignment, exposure time, focal length etc. I usually get about 50% good frames at 30sec and f9 without using the Periodic Error Correction on the mount computer) 10 dark frames (5 before and 5 after the images) are made by flipping the mirror back to the eyepiece.
With the guider running and good polar alignment, exposures in excess of 2min are possible. Good PEC training helps the guider performance.
(Note I normally work unguided now (see above)
The process is then repeated with Red, Green and Blue filters in place in turn. Note that the focus is different with and without filters due to the refractive index of the filter material. This often means moving off target to find a bright enough star to see on the TV monitor. With my filters I find I do not have to adjust focus between each filter. So far, I have used the same exposure for each filter. This may well not be optimised. Generally longer blue exposures are recommended due to the lower sensitivity of CCDs to blue. My blue filter is quite light however so gives a well exposed image at the same settings as the red and green.
An option is to use the low resolution setting in iCatch for the colour frames. This uses binning and increases the image brightness. They are converted to full resolution using the x2v option in K3CCD before stacking and combining. The lower resolution of the colour channels is not apparent in the final image.
Flat Field
The 1004x, for some reason which is still under investigation gives a dark band near the top of the frame. This can be compensated for using a "flat field" an image of an evenly illuminated field, which is then used to correct the image in software. I am still experimenting with the best way to do this. A separate flat field image can be made by pointing the scope at a field free of stars (which in my experience can be difficult to find, though one or two can be edited out later) The method I normally use at the moment is to make a flat field out of the actual image taken, using a narrow vertical area of the image free of stars and cloning it across the width. This only compensates for the main vertical gradient but it has the advantage of exactly matching the actual image.
My usual technique now is to produce an unaligned stack of the image frames. clone out any v bright stars/large objects, and use the dust and scratches and gaussian blur filters in Photoshop to produce a smooth flat
Processing
Software:-
This is Jon Grove's purpose built software, which controls the 1004x long exposure modified camera and saves frames in an avi file
This is Peter Katreniak's superb freeware program which takes care of extracting the avi frames, looks after dark and flat field correction, aligns them and stores them as bmp or fits files.
AVIS FITS viewer
I use this to view each colour at maximum depth as a FITS file and manipulate the histogram to give the best brightness /contrast for import as bmp files
Photoshop 6
I use this for general image processing and combining the LRGB frames. Other general purpose imaging programs will no doubt work equally well.
blackFrameNR
This program does dark frame subtraction without producing black pixels in place of saturated pixels
Procedure
1. For each of the L,R,G,B avi files
a. Import the file into K3CCD
b. Select the dark frames, select the full frames and average them. save the result as a bmp
c. Select this file as the dark frame and apply it to all frames in the file
Using this technique gives black pixels where saturated pixels were in the dark frame. To avoid this I use a freeware program called blackFrameNR Unfortunately it is rather laborious as each frame has to be processed individually
d. To make a flat frame from the same file
i Select all the good frames you will use to make the image, select the full frames and average them without any alignment
ii Save the result as a bmp
iii Import the resulting bmp into the Image processing software, select a vertical strip, eg at the edge which is relatively free of stars and create a new image from it. Rub out any stars etc by copying background areas horizontally
iv Resize the strip to make it only one pixel wide, then resize again to full width eg 640 pixels. The result is a vertically graduated flat field. Use a blur function to smooth any sharp transitions. Save it as a greyscale bmp
This process can give a rather streaky flat and does not compensate for gradients across the image. An alternative is to use the whole frame and use Photoshop dust and scratches filter to remove most of the stars. Remaining objects can be removed by cloning adjacent areas. Then Gaussian blur to give a smooth flat
e. Select this flat field and apply it to all the frames in the file
f. Select all the frames to be used for the final image, select the whole frames and save them as a bmp series
2. Do this for L,R,G and B
3. K3CCD can now be used to align them all together as a set. Once they are all aligned, select the sets of frames for each colour in turn and average them. Save the results as FITS files for each colour to preserve the maximum image depth.
Note, if there is any scale differences or rotation between the LRG,B then alignment in K3CCD has to be done separately for each colour, and final alignment done in Photoshop.
4. Import each colour FITS files into AVIS and tune the histogram as required to give the best image. Save as bmp (Also keep the FITS files after the final image has been produced. They will be useful if it is desired to produce a new image highlighting a particular depth in the image)
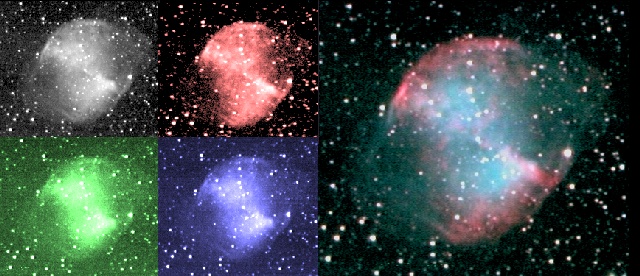
5. Import the RGB images into the image processing program (eg photoshop) and combine them to produce an RGB image. Blur the image to reduce noise and tune the colour balance. (A high resolution image is not required as the L image will give this. What is required is a well balanced, saturated noise free image)
6. Import the L image into the image processing program and manipulate it to give the best detail eg by using an unsharp mask etc.
7. Combine the RGB and L images, using the L as the Luminance. All being well, all the images should be in register and the final image should have the detail of the L image and the colour of the RGB image. (If the images are rotated relative to each other this needs to be corrected before they are combined)