Using an Objective Prism (a wedge prism placed in front of the
telescope aperture) is a long established way of
producing
low
resolution
spectra. A
similar
technique
can be used with a
diffraction
grating, but
large
diameter
gratings (and
objective
prisms) are
expensive and
the
dispersion
produced
by even a coarse
100
lines/mm
grating is
unmanageably
high
with a
typical telescope
focal
length.
Using a
camera
lens
instead of
a telescope
however
gives
a more reasonable
dispersion and the
smaller
objective size
of a
typical
camera
lens means
small
affordable but
efficient 1.25 inch
diameter
gratings
such as the Star
Analyser
can be
used.
Of
course
using
such a small aperture
restricts the
technique
to brighter
objects but
because the light from
the star is
already
collimated, it
potentially
can give significantly
improved
resolution
(typically
3x)
compared with
the alternative simple
technique
of placing the
grating in the
converging beam
between the
telescope and
the
camera.
Making the
most
of this potential
increase in resolution requires
a
higher
dispersion than is
normally used with
the Star
Analyser,
which
means a larger
camera
detector if
the full
spectrum plus zero
order is
to be
imaged. (Useful to aid
focusing and calibration,
particularly for
beginners). A large format
monochrome astro
camera
would be an
ideal
but expensive option. Alternatively
Digital Single Lens Reflex cameras such
as the Cannon 350D
etc perform well
under astro imaging conditions and can be
used successfully in this application, though
with
restricted wavelength
range towards the IR unless
the internal IR blocking filter has been
removed or
replaced.
The
choice of lens focal length depends on a number
of
factors:
The
dispersion increases
proportionally with
focal
length but
so does the size of
the star
image so the
resolution
is
largely
independent of
focal length.
A shorter
focal
length
means a
shorter,
more concentrated
spectrum and
therefore
fainter
objects can
be
recorded.
With
too short a
focal length however, the star
image will
be
undersampled (ie the
star
image
will be smaller than a single
pixel,
remembering that for
a colour
camera
like a DSLR, the
effective
pixel
size is
larger than a single
pixel due to
the Bayer pattern
of pixel colour
coding).
Undersampling
can produce
severe
artifacts in the spectrum,
particularly with
colour
cameras.
A
short
focal
length also
means a
greater area of sky
is
imaged
giving a
higher sky
background brightness and
an
increased risk of
interference from other
stars and their
spectra.
(Note that
using
this
technique with
short
focal lengths
can be useful for
recording spectra
of fainter
diffuse
objects such
as comets as seen here
bottom
of
the
page. In extreme
cases
it also
be used
to cover
a
wide field at ultra
low
resolution
as in this meteor
spectrum)
Too
long
a
focal length and it
will not
be
possible to fit
the star
(zero
order) and spectrum in the
frame.
Tracking also
becomes
more
critical at higher focal
lengths.(Indeed,
with modest
focal
lengths it is
possible to produce
"drift
spectra"
with a fixed
camera)
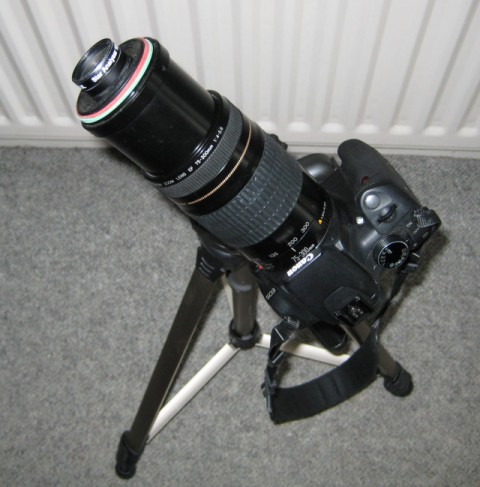
The Setup
For these tests I used a 100 lines/mm Star Analyser grating with a
Canon
350D
camera
fitted
with a
75-300mm
zoom
lens at
200mm focal length
which
gives a
dispersion
of about
3.5A/pixel. It was
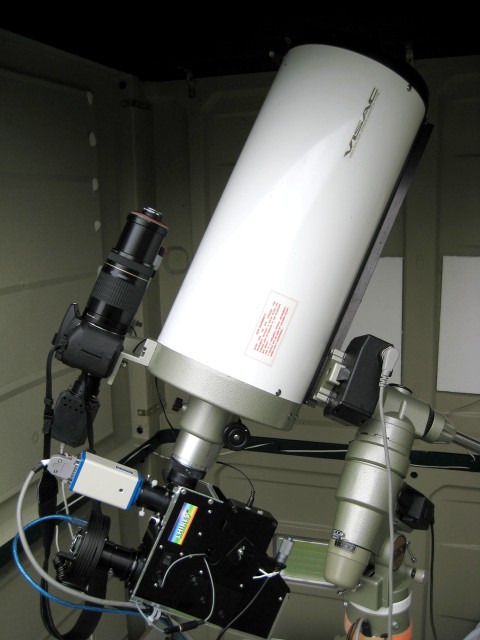
piggyback mounted on
my main
telescope. ((It is also
possible to used a fixed camera on a
tripod, orientating it
so the
star drifts
perpendicular
to
the
dispersion
direction.)
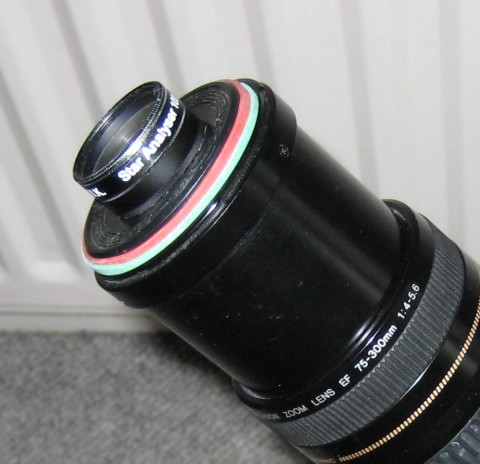
To mount the grating, I cut a hole in a lens cap and
screwed the Star Analyser into it. To make it easier to
rotate the grating
independent of
the focusing adjustment,
I added a
blank rotatable filter
cell
(from an
inexpensive
crossed
polarising
filter set) between the lens cap and the
Star
Analyser. An
alternative could be to adapt a
blank
photographic filter
cell the right
size for the
lens.
This could be
orientated by screwing the
assembly
in
and out. The small
grating
aperture
produced some vignetting but provided the calibration
reference star is placed at the same position as the
target this is not a
problem
.
(Note flats cannot be used in the conventional way with slitless
spectroscopy like this. See here for some tips on how
to avoid flat field defects in Star Analyser
spectra)
 |
 |
|
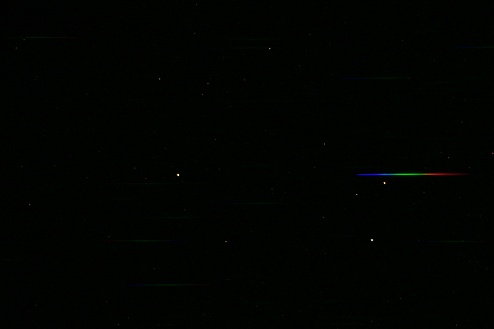
A typical single 30sec exposure of Epsilon Aurigae
(7th full size)
Click on the image
to view full size
(1.5Mb) |
Flat field |
You need some means of operating the camera without getting camera
shake
and
viewing the
images
immediately
in full
resolution to
check
for positioning,
orientation and focus. I
control
the
camera and view the images on
a
laptop using a freeware
program
called Focus
Assist
but you will
no doubt have your
own
favourite
method
if you are already
astro-imaging
with your
camera.
Recording the Spectra
If you are using a DSLR camera set it to record RAW images.
(unlike jpegs, these are uncompressed, have a greater bit
depth and do not have
a white
balance setting
applied)
As
well as your target
star spectrum
you
should record darks
and at least once
(and
ideally
every
session), a calibration
star
spectrum (a
bright spectral
type A
star is best eg
Vega, Altair,
Castor, Regulus,
preferably at
similar elevation to
your target).
It is a
good
idea to take the
calibration star
spectrum
first,
using it to
get the focus and
grating
orientation correct and then move to
the
target
without
disturbing the
settings.
Start by recording an
image
without
the
grating in place.
Position the
star in the
centre
left of the
frame,
leaving
enough
room to the right for
the
spectrum. Try to place the star
at
the same position in the field each time to minimise flat field effects (A
zoom lens is handy
here
as
you can
locate
the star and
position it
roughly
before zooming in.) Check that
there
are no faint
stars
close
to a
line
running
horizontally from the star
in
the
region
where the
spectrum will
fall and no bright
stars
on the
same
line
within the
frame or
within a frame either side
which
could potentially
produce spectra overlapping
with the wanted spectrum. If there are,
reorientate the
camera so that
the horizontal line is free from such
potential
interference.
Note I
f you are
using the camera on
an undriven mount,
orientate the camera with the horizontal axis
of
the camera
field pointing at the
celestial
pole.
(ie
orientate the
spectrum
along the Dec
axis). That
way
any star
trailing will
occur
perpendicular to
the direction
of the spectrum. If
there is potential
interference
from other stars,
you will be unable to
rotate
the
camera to avoid
them but
you could
try running
the spectrum from left to right
instead by
rotating the
grating 180
deg.

A "drift spectrum" of Altair taken using a fixed camera and
200mm
lens on a
tripod
Once
you are
happy
with
your
camera
orientation, focus
carefully
on the
image of the
target
star and fit the
grating
to
the
front of the camera,
taking
care
not to disturb the
focus.
Take test
shots,
rotating the
grating until the
spectrum is exactly horizontal.
Note It is important
to get
the spectrum as
horizontal as
possible as
although the image can be rotated in
software
later, this can
produce artifacts,
particularly when
working with such
narrow
spectra.
Check the
focus carefully and adjust
if
necessary,
making sure that
the
spectrum
remains horizontal. If
there
are
features visible in the
spectrum
(sometimes made
more
visible by
deliberately trailing the image by
manual adjustments to the drive) it
is a good idea to
focus on those
rather than the zero order star image but
if you
cannot see any features, the
best focus of the
star
image
will be
almost as good, depending on the
quality of your lens (It is here
that patience
is rewarded with
higher resolution in the spectrum.)
Note If you find that
you
cannot
get
optimum focus
across the
whole
spectral range and
have
to
chose a compromise
setting,
this
is because
of
achromatism in
the lens you are
using. You may also see
the
same effect in the
star
image.
Once you
are
happy with the
image, adjust the
exposure
time to
maximise the
brightness while
avoiding
saturating any
pixels in
the area of
the spectrum
(It
is permissible to
over
expose
the zero order star
image) and
take a series
of at least 20 images,
more if
your
spectrum is
faint.
Note It is not
a good
idea to
allow the spectrum to fall
on
exactly
the same pixels in every
image
as
this makes the final
result very
susceptible to defects in
individual
pixels
and
also
produces
artifacts due to
the
pattern of
colour pixels. If your
tracking is
good,
you
may need
to introduce deliberate
shifts between
each
exposure (A
process similar to
dithering) this
can also help if
your
focal
length
is so
short that you
are potentially
under
sampling.
Continue to Processing the Spectra
>>>